Erosion Control – How to Prevent Erosion on Your Land

Erosion causes damage to rivers and bodies of water, impacts ecosystems, and reduces plant growth. Effective erosion control is essential for protecting the environment, wildlife, and human property.

Erosion Control

Techniques like terracing, swales, and changing slope grades help stabilize the soil. Barriers such as silt fences and traps prevent sediment from entering runoff. Visit https://dockbuildingcharleston.com/ to learn more.

Plants can act as a natural erosion control by binding soil together, stabilizing slopes, and providing shade to prevent excessive water loss. They also help to reduce soil erosion by slowing runoff, absorbing rainfall, and reducing sediment concentrations. Planting vegetation is a cost-effective and sustainable way to improve the health of your land. It is important to choose vegetation that is native to the area, as it will better adapt to the climate and soil conditions and be resistant to pests. Avoid invasive plants like Himalayan blackberry or English ivy, as they have low erosion control values and may out-compete other desirable species.

Increasing vegetation coverage can drastically decrease soil erosion rates by restricting the flow of water, decreasing runoff volume, and reducing sediment concentrations. In addition, the presence of vegetative cover helps to protect the soil from wind and sunlight which can exacerbate erosion processes. Depending on the type of vegetation, some can also promote soil fertility and enhance wildlife habitat.

Erosion is a natural process that occurs when the nutrient-rich topsoil in fields and on slopes is displaced by water or wind. This eroded material can be carried away and lost from site, degrading cropland productivity and contaminating waterways. Similarly, erosion on construction sites can displace up to 500 tons of soil per acre, creating hazardous conditions and costly clean-up operations.

The most effective means of preventing erosion is to plant vegetation in the affected areas, particularly native plants. These plants form a web of roots that help to hold the soil together and reduce erosion. They are also adapted to the local environment and can resist drought, making them an excellent choice for construction sites.

The importance of preventing erosion cannot be overstated, as erosion can damage or destroy landscapes, crops, and infrastructure, as well as contaminate waters. Good erosion control practices can save a great deal of time, effort, and money in the long run, as well as preventing soil loss and protecting human life and the environment. Erosion control starts with proper planning and forethought to ensure that the right plants are planted in the right places to achieve the desired result.
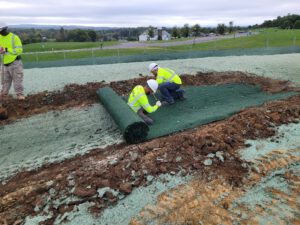
Soil Blankets

Erosion control blankets, also known as erosion mats or jute matting, are rolled sheets of organic and synthetic fibers that can be placed on sloped ground to prevent soil movement and promote the growth of new vegetation. They are typically anchored in place by digging a shallow trench along the edge of the site. The soil in the trench is then compacted and tamped down to ensure that the blanket stays in place. Blankets may be made of woven or continuous natural or synthetic material, such as coir, jute, straw, excelsior, coconut or polypropylene.

A natural product, such as straw or coir, has the advantage of degrading quickly and promoting the growth of new vegetation. However, these products tend to snag and uproot small plants. They are also prone to being pulled apart during rainfall events, especially on steep slopes.

To avoid these problems, look for a product with a higher percentage of synthetics, which are more resistant to damage and last longer than natural materials. High-performance turf reinforcement mats (HPTRMs) are designed to withstand heavy use and offer greater tensile strength than other erosion control blankets. They are ideal for sites with little or no existing vegetation and include grading and fill areas, slopes, structural backfills, high-flow water channels, maintenance access areas and coastal and riverbank erosion protection.

Before laying an erosion control blanket, inspect the site to make sure that it is clear of debris such as branches, rocks, dirt clods and roots. Dig a trench along the edge of the site, remove the excess soil and then compact it with a shovel or tamper. This will help to anchor the blanket and prevent it from being dragged downhill during rainstorms.

Once the blanket is in place, it should be inspected for signs of damage after every rainfall. Inspect for snags, where the blanket is tangled in vegetation and pulled away from the soil, and pulls, where the runoff or weight of precipitation catches on to the matting and pulls it downhill. Check for loosened fasteners and stakes, as well as for sections of the blanket that have been flipped up by animals or the weight of rainfall.

Riprap

Riprap is large rock used to protect shore lines, river banks, bridge abutments and foundational infrastructure support against erosion from waves, wind or water scour. It can be made from a variety of materials, including granite, modular concrete blocks and rubble from building or paving demolition. Riprap is typically positioned in layers. The top layer, called the “armor layer”, catches the initial impact from waves and helps to prevent erosion from scour beneath it. The bottom, or “filter layer”, is a thick layer of smaller rocks that filter sediment from the water and help to hold the riprap in place.

It is important that the correct sized riprap be used. The larger the riprap, the more resistant it will be to erosion. The size of riprap should be determined by the location and conditions. For example, in locations with high velocity waters or steep slopes, a much larger amount of riprap is required than in calmer areas with gentler slopes. It is also crucial to monitor riprap locations after heavy storms to make sure they are still secure and not shifting or breaking apart.

While riprap does offer effective erosion control, it is not without negative environmental impacts. If not carefully chosen and placed, it can alter sediment transport and sand composition, cause habitat degradation and destroy wildlife and fish-spawning zones. However, if native plants are planted around riprap or allowed to become colonized by vegetation, many of these negative impacts can be minimized or eliminated.

For example, a rocky shoreline lined with riprap can be less harmful to sea turtles if it is designed and constructed with the presence of vegetation in mind. This not only looks better for the environment but also allows wildlife to nest and spawn on the beach without getting trapped by riprap that may obstruct their access.

Another way to lessen the impact of riprap is to use it in conjunction with other erosion control measures, like a vegetated staking. This is particularly important in areas where endangered or threatened species live or migrate through habitat-transition zones.

Check Dams

Check dams are small barriers constructed of rock, organic filter tubes or sand bags placed across the width of drainage swales and ditches to reduce flow velocity, provide a limited sediment barrier and promote a more natural stream/ditch profile. They are an important component of the sediment control system in a drainage ditch or swale, but should not be used as a substitute for major perimeter sediment trapping measures.

Construction of a check dam requires careful placement of the material to prevent scour and channel degradation around its edge. The center of the check dam should be lower than the edges, and a gravel base should be placed at the bottom of the dam to stabilize it. The dams should be checked regularly for damage, such as holes and clogging, and repaired immediately. The top of the dam should be anchored to an appropriate slope, such as the downstream hillside or adjacent swale.

The use of check dams in global arid and semi-arid regions can significantly decrease soil erosion. This is due to the effectiveness of these structures in preserving a large amount of OC during the deposition process and providing an ideal environment for cropland. The accumulation of OC in the cropland can result in an increase in food production and carbon sequestration.

These structures are an effective method for reducing eroded sediments in swales and drainage ditches with steep slopes (greater than 3 percent) and soil types conducive to gully erosion, such as sandy/silty soils. They are also appropriate for temporary, linear ditches and swales during construction activities and may be used as part of the permanent sediment control system once the site is graded and seeded.

The use of check dams can be a cost-effective option for improving water quality in urban and rural streams and rivers. They can help reduce sediment and nutrient loads to a waterbody and increase the infiltration capacity of the channel, while at the same time providing an opportunity to restore and preserve the natural habitat and wildlife that is destroyed by eroded sediments.

The Importance of a Clean Chimney

Your chimney, which could be masonry or prefabricated metal, should be cleaned at least once a year. A clean chimney is crucial for fire safety and a safe home environment. See https://chimneysweepcharleston.com/ for more.

clean chimney

You can do this yourself by purchasing a wire chimney brush the right size for your flue and some extension rods (these usually screw on). Set a ladder high enough to reach your roof and cover any furniture with plastic or a drop cloth.

Creosote is a natural byproduct of burning fossil fuels like coal and wood, a dark, sticky, tar-like substance that can cling to your chimney’s walls. Creosote isn’t just unsightly; it’s dangerous if not removed promptly and can cause chimney fires and other serious problems. Chimney sweeps call this deposit “smoke tar” or “sticky soot.” Creosote can be in any of three stages: First-degree creosote is a light dust that’s soot-like in appearance and easily removed with a chimney brush during a cleaning appointment. Second-degree creosote is harder to remove and looks more like tar. It’s at a much higher risk of causing chimney fires and can require more specialized tools to clean. Extremely unfavorable fires, such as those with insufficient airflow or unseasoned firewood, can lead to thicker deposits of creosote that are harder to remove. It is known as Stage 2 creosote and is at high risk for chimney fires because it restricts air movement inside the flue.

Creosote can also cause health problems if exposed to your skin or lungs. Its strong, acrid smell can irritate your nose and throat. If you inhale it for extended periods, it can cause respiratory issues and even a type of burn called pyrolysis fume fever. Research has shown creosote is carcinogenic, so that long-term exposure can increase cancer risk.

During a normal chimney fire, the oils in unseasoned or uncut logs release volatile compounds that travel up with the smoke and stick to the walls of your fireplace and chimney. When the smoke cools, the chemicals condensate and form creosote. This process occurs in every fireplace and chimney, but it happens faster in homes with a poorly functioning fireplace or flue.

Stacking your firewood helps improve combustion and reduces creosote. If you’re unsure how to prepare your wood before burning, ask an experienced chimney service technician for advice. In addition, making sure your flue is preheated before you start a fire can reduce condensation and creosote buildup.

When fireplaces are not regularly used, the chimney can quickly accumulate smelly debris. This debris, which may include fallen leaves, twigs, feathers, animal feces, and even the carcasses of dead animals, can produce a foul odor. That is especially true when these materials are exposed to humid summer temperatures and moisture. That is because the decomposition process accelerates when these conditions are present.

When a chimney is used, an updraft of hot air pushes stale odors and smoke through the flue and out of the home. However, when the chimney is not in use and there is no updraft, those moldy odors can return to the house along with moisture from humidity and rain. This moisture can also seep into the stone masonry of the chimney, leading to mold and mildew problems.

If these issues are left untreated, they can lead to serious damage and health hazards. The best way to prevent these problems is to ensure your chimney is inspected and swept at least once yearly, especially during spring and summer. A professional chimney sweep can remove any accumulated creosote and eliminate the odor-causing debris from your fireplace, thus ensuring that no unwanted odors are entering your house.

In addition to annual cleanings and inspections, you should invest in a good chimney cap. A well-fitting chimney cap will keep water, humidity, and other undesirable elements out of the shaft. It can also prevent small animals and birds from entering your chimney, bringing feces and other odor-causing debris.

While nothing adds to a winter evening like a crackling fire and family gathering around the fireplace, it’s important to take safety precautions. Children should always be kept from the fire, and adults should keep a fire extinguisher nearby. It’s also essential to keep the chimney and fireplace clean. If creosote and ashes build up, it can clog the vent and prevent proper ventilation, which is dangerous for home occupants. It can result in carbon monoxide poisoning and house fires, among other issues.

Creosote is flammable, and if it builds up enough, it can cause cracks in “fireproof” brick, stone, or clay flue liner. These cracks can allow hot creosote to reach combustible wood framing or other materials in your home. A dirty chimney is the cause of many house fires each year. Regularly cleaning your vent and having a professional inspect it yearly is the best way to avoid these dangers.

Chimney fires can cause significant damage to a chimney, requiring costly repairs that could have been avoided with regular maintenance. In addition to creosote, chimney fires can be caused by paper and blown-in debris, bird’s nests, feathers, and other items that can easily ignite when exposed to flame. Lightning strikes can also cause a chimney fire.

Keeping the chimney and flue free of debris, birds’ nests, twigs, and other materials makes ensuring adequate airflow during a fire easier. It helps the fire burn more thoroughly, reducing byproducts like smoke and carbon monoxide. It’s also important to have a properly functioning chimney cap, which keeps leaves and other debris out of the flue and allows smoke to escape effectively.

If you decide to clean your chimney yourself, having a helper is a good idea so the job can be completed safely and efficiently. Be sure to purchase a chimney brush that’s appropriately sized and shaped for your flue and a set of extension rods long enough to run the entire duct. You should also purchase a pair of rubber work gloves and a face mask to protect yourself from the dust and chemicals.

With all the responsibilities homeowners try to stay on top of, cleaning their chimneys can often fall by the wayside. It is a shame, as a dirty chimney can cause serious problems. Some of these problems are expensive, and others pose a danger to the home’s occupants.

If a fireplace chimney gets too sooty and creosote-laden, it can ignite. This combustive residue can quickly spread from the flue to the surrounding masonry, and it is a major culprit in many house fires. Periodic chimney cleanings can prevent the buildup of this dangerous substance.

Chimneys also have an important job of venting smoke and other combustion byproducts outside the house. Unfortunately, these byproducts can get pushed back into the living areas when the chimney is too clogged with twigs, leaves, and animal nests. These byproducts can include toxic carbon monoxide, which is odorless and tasteless but can be deadly at high levels.

Regular chimney cleanings can prevent this by removing these obstructions and allowing proper airflow. A clogged vent can also make it difficult for heat and smoke to escape, leading to a drafty house.

Keeping up with routine chimney cleanings will also help to keep energy costs low. A clean chimney is more efficient and can allow a fireplace or wood stove to operate with less heat, saving money on heating bills.

A clean chimney will make it easier for a certified sweep to inspect the chimney liner, damper, and masonry structure. Large soot and creosote buildups can obstruct these areas, making it hard to spot problems in their early stages when they are easy to repair.

When hiring a chimney-sweeping company, finding one certified by the Chimney Safety Institute of America (CSIA) is important. During cleaning, your chimney sweep will wear a face mask to protect themselves from ash and creosote dust. They will also cover your furniture and carpets with plastic or drop cloths and use a shop vacuum to remove dust films from surfaces. It will prevent ash and creosote from getting on your rugs, furnishings, and clothing. According to local laws, the creosote removed from your chimney will be bagged and disposed of.

Why It’s Important to Have Your Vinyl Siding Repaired

A home with siding looks unique, but maintaining it can be a hassle. Replacing aging or damaged sidings can give your house the curb appeal it has been missing.

Vinyl Siding

Keeping your composite siding repaired on time prevents damage from worsening. It also helps protect your property from water damage and wood rot. For professional help, contact Charleston Advanced Siding Repair now!

Vinyl is a popular choice for siding due to its low price and resistance to the elements. However, it’s important to repair any cracks or holes in vinyl to protect your home against moisture damage and pests. In addition, regular maintenance and repairs can extend the lifespan of your vinyl siding by preventing it from becoming worn down or sagging.

When repairing vinyl, it is important to use the appropriate materials for the job. While some homeowners may be tempted to use silicone-based sealants, these can degrade or fade in sunlight and are not recommended for vinyl siding. Instead, a color-matched caulking is recommended. This can be applied to any divots or holes in the vinyl, and can be smoothed with a putty knife before being painted to match the rest of the vinyl.

Before beginning any vinyl siding repair project, it is a good idea to clear away any debris or obstacles that could interfere with the work. It is also a good idea to use a ladder if working at an elevated height, and wear safety goggles and gloves. Finally, it is always a good idea to use caution when working with tools like tin snips or utility knives.

To begin the repair process, it is a good idea to clean the affected area with warm soapy water to remove any dirt or debris. Once the area is clean, it is recommended to apply a small bead of color-matched caulk, using a caulking gun. This can be smoothed with a putty or paint knife, and is then allowed to dry before being sanded and painted to match the surrounding vinyl.

For larger divots or holes, it is usually necessary to replace the damaged panel. To do this, first, remove any nails or screws from the sheathing that hold the broken vinyl panel. Then, use a pry bar or hammer to lift the panel from its place and expose any nails or screws holding it to the sheathing. Then, cut a replacement panel of vinyl to the proper size and position it in its place. This can be done by pushing up on the bottom edge of the panel until it locks into the vinyl above it.

Everlast Siding

Everlast siding is a cutting-edge new material that is taking the premium siding market by storm. Its innovative triple-composite formula yields the most advanced composite siding and trim products on the market, with superior durability in all weather conditions and virtually zero required maintenance (apart from a regular wash). It is also backed by a best-in-category Limited Lifetime Warranty.

Made from granular minerals and polymer resins, Everlast is a highly durable and long-lasting alternative to traditional wood, fiber cement, and typical vinyl. It is molded into siding panels that are then installed on homes like yours. The siding is extruded into a wide variety of profiles and colors, and the face is covered by a fade-resistant acrylic colorant layer. The siding is then backed by a polymer and reinforced by the mineral core for strength.

One of the most important features of Everlast is that it resists moisture – something that causes a lot of problems for other premium siding materials. When moisture seeps through the exterior, it can cause cracking and rot. Everlast is impervious to this problem, as the mineral-rich composition does not absorb moisture and expand or swell, so it does not get soft and warp.

Another way in which Everlast exceeds other types of premium siding is that it is impervious to wood-boring insects. These pests can cause serious damage to wood, including rot and delamination. In contrast, Everlast is resistant to insect attack and comes with a limited lifetime warranty against termite damage.

The most impressive thing about the material is its low-maintenance requirements. There is no need to paint or caulk it, and the only maintenance needed is a regular washing with a hose. This can save homeowners a great deal of time and money. It is also a great way to avoid costly home repairs and add value to the property when it is sold in the future. If you are considering replacing your siding with Everlast, you should work with a local New England installer that is trained to handle this unique product, such as United Home Experts.

Vinyl Siding Inspections

Vinyl siding is one of the most popular forms of exterior cladding in new construction and remodeling. It is a highly versatile product that comes in many colors and styles, and is often textured to resemble wood or stone. In fact, it’s one of the most common exterior cladding products that home inspectors examine on a regular basis.

Whether your vinyl siding is leaking, molding or showing other signs of damage, it’s important to take action and perform an inspection. Doing so will help prevent these problems from worsening and protect the value of your home.

When it comes to inspecting vinyl siding, the most obvious indicators that a repair job is necessary include cracks and chips, discoloration and fading, and mold and mildew growth. In addition, homeowners should also look for any areas of loose or missing siding, as well as signs of insect or animal damage.

In order to maintain vinyl siding, you should regularly clean your house’s exterior to remove dirt and debris that can cause damage. You should also be sure to check for proper drainage, as water that pools or stands around the foundation of your home can lead to damage.

Another sign of improper maintenance is bringing vinyl siding to ground contact or even below ground level. As this Carson Dunlop Associates photograph shows, bringing siding down to the ground creates an engraved invitation for termites and other wood destroying insects to attack the structure. It is recommended to have 6-8” of clear foundation wall siding above the bottom of your siding panels.

Other causes of improper maintenance can include stapling or nailing through the face of the siding. This can result in rippling and distortion of the siding. Caulk should be used only where panel edges meet or meet adjacent panels, such as inside corners, outside corners and J-trim. It is also recommended to use a caulking gun that has a wide nozzle that will allow for the application of a thicker bead of caulk.

When it comes to installing vinyl siding, you should always check references and use a contractor who is a VSI certified installer. This will ensure a high quality installation and protect you from shoddy workmanship that can have costly consequences.

Vinyl Siding Repairs

If your vinyl siding is beginning to show signs of damage, you should have it repaired immediately. This will protect your home from moisture infiltration that can lead to mold, mildew and rot. Look for cracking, warping, fading and holes. You should also take a close look at the caulking around your windows and doors – if it is cracking, peeling or missing then this should be replaced immediately to prevent water infiltration.

Whether your vinyl siding needs to be repaired or replaced, it is important that it is done by a professional. This will ensure that the job is done correctly, and that your vinyl siding looks like it did before the damage occurred. Often times, insurance companies will pay for repairs to vinyl siding after a storm. The team at Advanced Siding Repair is very familiar with this process and will work with you to maximize your compensation for any necessary repairs.

To repair a small hole in vinyl siding, start by de-glossing the area using warm soapy water. This will help the new filler adhere to the vinyl surface. Next, prepare the hole by removing any loose debris and cutting away the damaged area. Once the hole is ready, cut a replacement patch from a new piece of vinyl siding. The patch should be slightly larger than the hole and should extend about two inches on both sides. Once the patch is cut, apply exterior-grade vinyl siding adhesive to the back of the piece and press it firmly onto the damaged area.

Once the adhesive is applied, use a plastic putty knife to smooth the filler. When the filler is dry, lightly sand it using 100-grit sandpaper, then 220-grit. Finally, prime and paint the repaired area to match the surrounding vinyl.

This will help to protect the patched area from UV rays and other environmental contaminants. Once the primer is dry, apply a coat of top-quality acrylic house paint to the patched area. Acrylic house paint is best because it will flex with the movement of the vinyl and will help to protect the patch from further damage.